Activity上で動かすFragmentは
LinearLayoutなどに動的に実装することが出来ますが、
レイアウトファイルに直接書き込んで実装することもできます。
今回はレイアウトファイルに直接fragmentを実装してActivityに表示させて
また、fragmentのレイアウトファイルに実装されているボタンから
Activityの関数を呼び出すコールバックも実装してみようと思います。
Fragmentを動的に作成する際の手順を省くことと
レイアウトに「fragment」を実装すること以外は同じで
処理の書き方などは変わらないのでどちらも目を通しておくと
良いかと思います。
今回のサンプルで必要なファイルは
【プログラムソースファイル】
*MainActivity.java
Fragment用ファイルX2ファイル
*BottomFragment.java
*TopFragment.java
【レイアウトソースファイル】
*activity_main.xml
*fragment_bottom.xml
*fragment_top.xml
後で追加するレイアウトファイル
*dammy_fragment_layout.xml
(クラス・ファイル名は任意で変更してください)
では、順番に記述していきましょう。
まずは、MainActivityですが、下記はデフォルトのままです。
*MainActivity.java
public class MainActivity extends AppCompatActivity{

  @Override
  protected void onCreate(Bundle savedInstanceState) {
    super.onCreate(savedInstanceState);
    setContentView(R.layout.activity_main);
  }
}activity_main.xmlの編集
次にactivity_main.xmlを編集します。
<?xml version="1.0" encoding="utf-8"?>
<androidx.constraintlayout.widget.ConstraintLayout xmlns:android="http://schemas.android.com/apk/res/android"
    android:layout_width="match_parent"
    android:layout_height="match_parent"
    xmlns:app="http://schemas.android.com/apk/res-auto"
    >


    <TextView
        android:id="@+id/tv"
        android:layout_width="match_parent"
        android:layout_height="wrap_content"
        android:text="TextView"
        android:textSize="16dp"
        android:textColor="#FF000000"
        app:layout_constraintEnd_toEndOf="parent"
        app:layout_constraintStart_toStartOf="parent"
        app:layout_constraintTop_toTopOf="parent" />


    <fragment
        android:id="@+id/fragment_top"
        android:name="(パッケージ名).TopFragment"
        android:layout_width="match_parent"
        android:layout_height="wrap_content"
        android:layout_weight="0.5"
        app:layout_constraintEnd_toEndOf="parent"
        app:layout_constraintStart_toStartOf="parent"
        app:layout_constraintTop_toBottomOf="@+id/tv"
        />

    <fragment
        android:id="@+id/fragment_bottom"
        android:name="(パッケージ名).BottomFragment"
        android:layout_width="match_parent"
        android:layout_height="wrap_content"
        android:layout_weight="0.5"
        app:layout_constraintEnd_toEndOf="parent"
        app:layout_constraintStart_toStartOf="parent"
        app:layout_constraintTop_toBottomOf="@+id/fragment_top"
        />

</androidx.constraintlayout.widget.ConstraintLayout>
ConstraintLayoutで作成していますが、LinearLayoutやRelativeLayoutでも
問題ありません(多少記述を変更する必要があります)
fragment内には(パッケージ名)とありますが、
name部分は作成したプロジェクトのパッケージ名とクラス名で構成されます。
(パッケージ名)の箇所を作成したプロジェクト名に変更して使用してください。
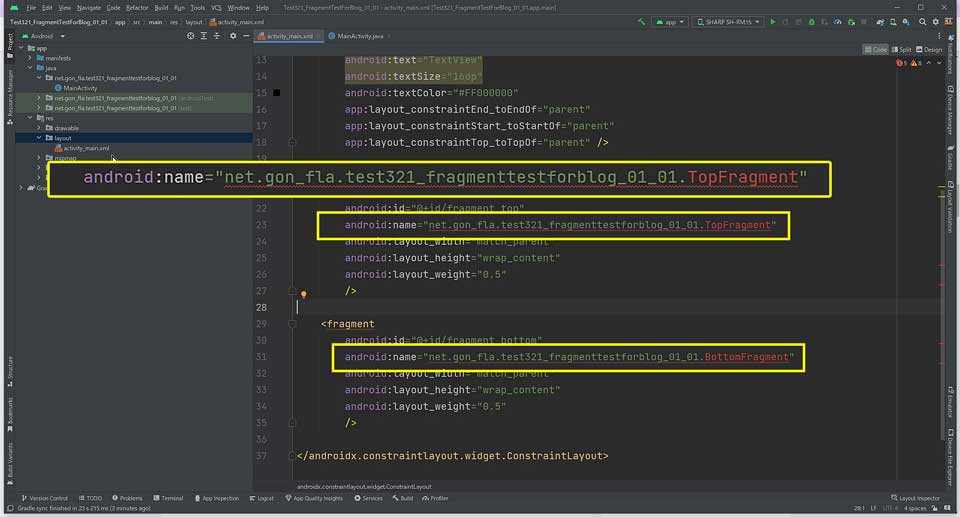
※レイアウトDesignのプレビューが見られなくて「Unknown fragments」というエラーが出るかと思いますが、後ほど修正します。
fragment_top.xmlの作成・編集
続いて、fragment_top.xmlを作成、編集します。
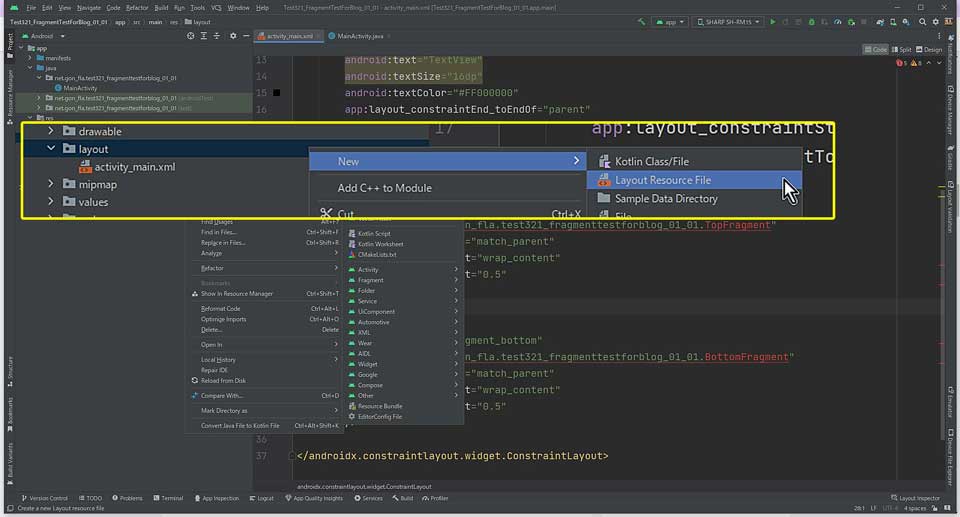
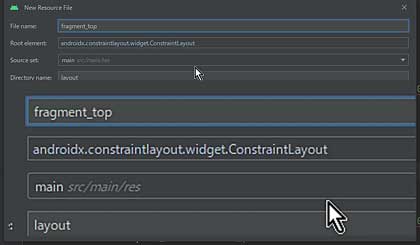
<?xml version="1.0" encoding="utf-8"?>
<androidx.constraintlayout.widget.ConstraintLayout
    xmlns:android="http://schemas.android.com/apk/res/android"
    xmlns:app="http://schemas.android.com/apk/res-auto"
    android:layout_width="match_parent"
    android:layout_height="match_parent"
    android:background="#FF000000"
    >

    <TextView
        android:id="@+id/textView"
        android:layout_width="wrap_content"
        android:layout_height="wrap_content"
        android:text="FragmentTop Layout Test"
        android:textSize="20dp"
        android:textColor="#FFFFFF00"
        app:layout_constraintEnd_toEndOf="parent"
        app:layout_constraintStart_toStartOf="parent"
        app:layout_constraintTop_toTopOf="parent" />

</androidx.constraintlayout.widget.ConstraintLayout>
fragment_bottom.xmlの作成・編集
続いて、fragment_bottom.xmlを作成、編集します。
<?xml version="1.0" encoding="utf-8"?>
<androidx.constraintlayout.widget.ConstraintLayout
    xmlns:android="http://schemas.android.com/apk/res/android"
    xmlns:app="http://schemas.android.com/apk/res-auto"
    android:layout_width="match_parent"
    android:layout_height="match_parent"
    android:background="#FFFFDDFF"
    >

    <TextView
        android:id="@+id/textView"
        android:layout_width="wrap_content"
        android:layout_height="wrap_content"
        android:text="FragmentBottom Layout Test"
        android:textSize="20dp"
        android:textColor="#FF000000"
        app:layout_constraintEnd_toEndOf="parent"
        app:layout_constraintStart_toStartOf="parent"
        app:layout_constraintTop_toTopOf="parent" />

    <Button
        android:id="@+id/bottom_btn"
        android:layout_width="wrap_content"
        android:layout_height="wrap_content"
        android:text="Button"
        app:layout_constraintEnd_toEndOf="parent"
        app:layout_constraintStart_toStartOf="parent"
        app:layout_constraintTop_toBottomOf="@+id/textView" />

</androidx.constraintlayout.widget.ConstraintLayout>
fragment_topをコピーしても良いですが、TopとBottomの違いを視覚的にすることと
コールバックを実装するためにボタンを追加しています。
また、背景色なども変更しています。
TopFragment.javaの作成・編集
それでは、Fragmentのソースコードを作成していきます。
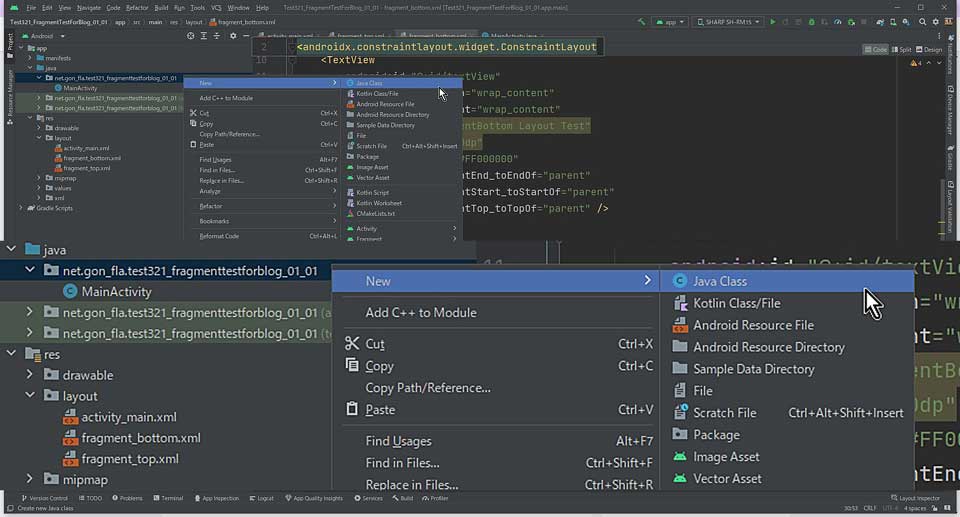
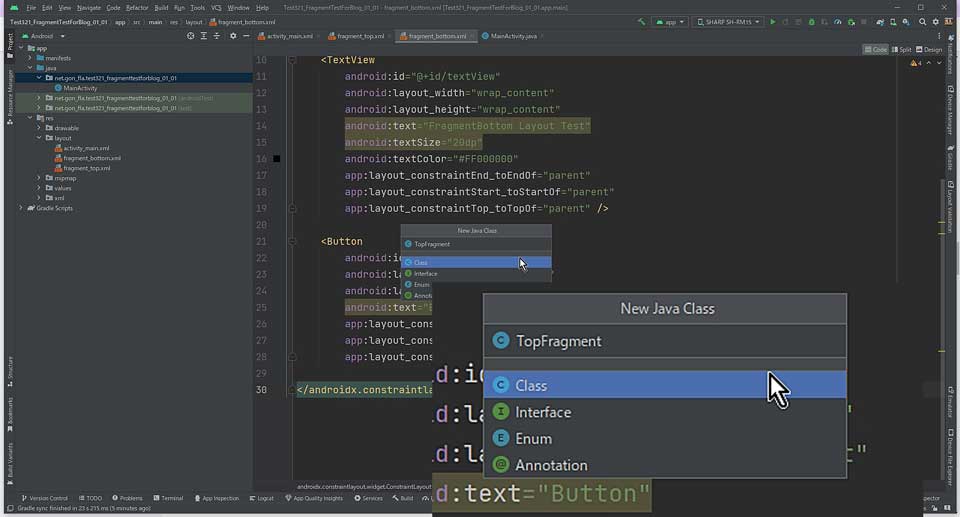
*TopFragment.java
public class TopFragment extends Fragment {
    @Override
    public View onCreateView(LayoutInflater inflater, ViewGroup container,
                             Bundle savedInstanceState) {
        return inflater.inflate(R.layout.fragment_top, container);
    }
}
return inflater.inflate(R.layout.fragment_top, container)
の部分でレイアウトファイルのfragment_topを指定しています。
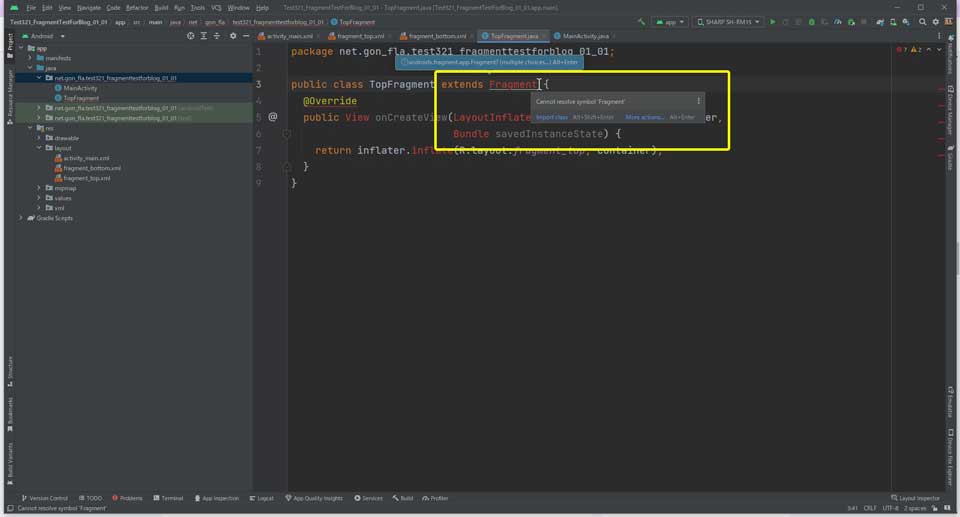
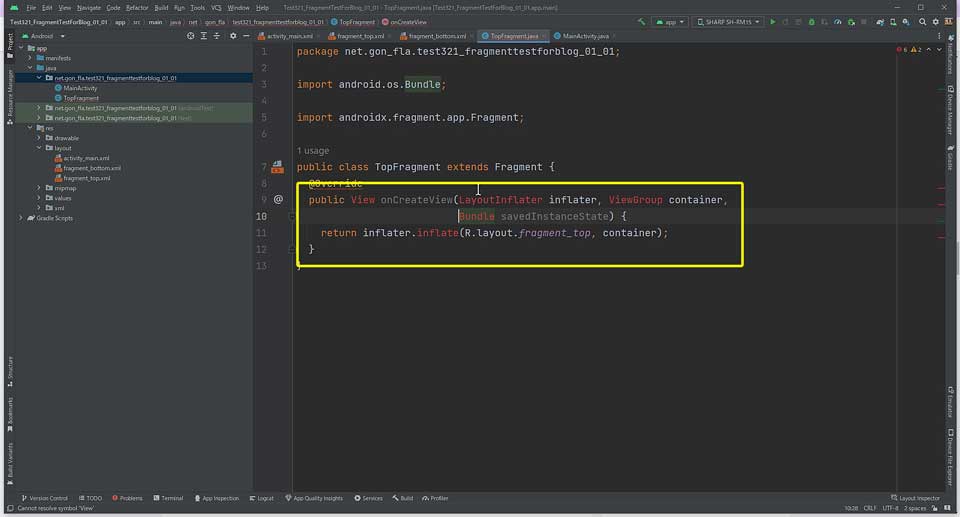
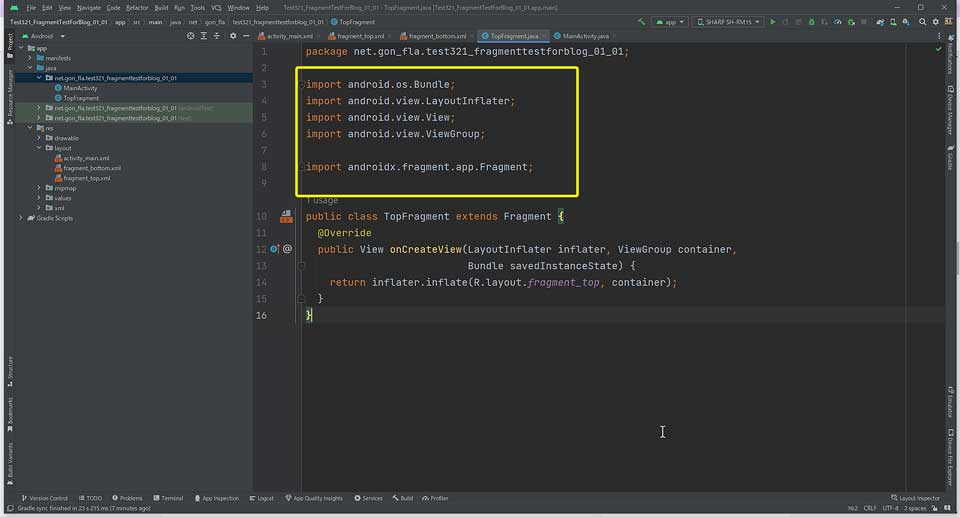
他のクラスが赤字で表示されても冷静に対応しましょう
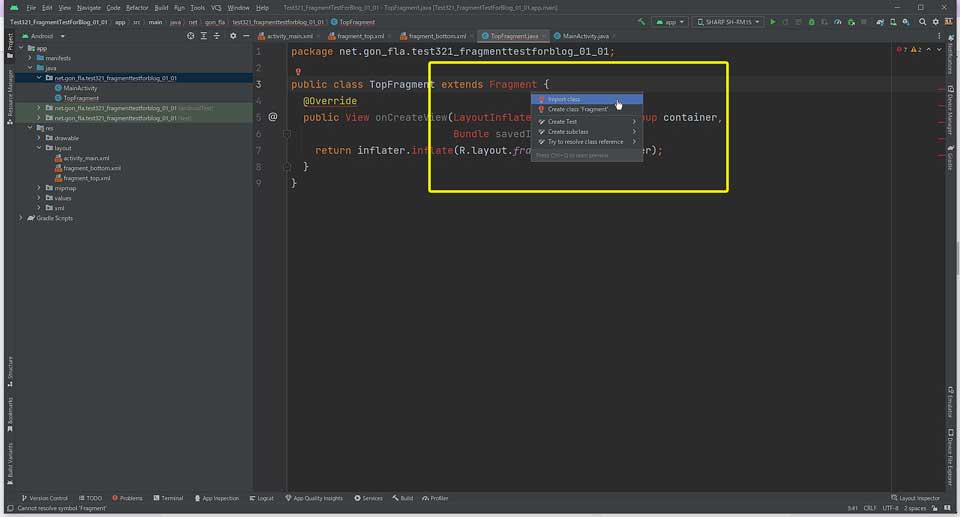
extends FragmentのFragmentが赤字で表示された場合は
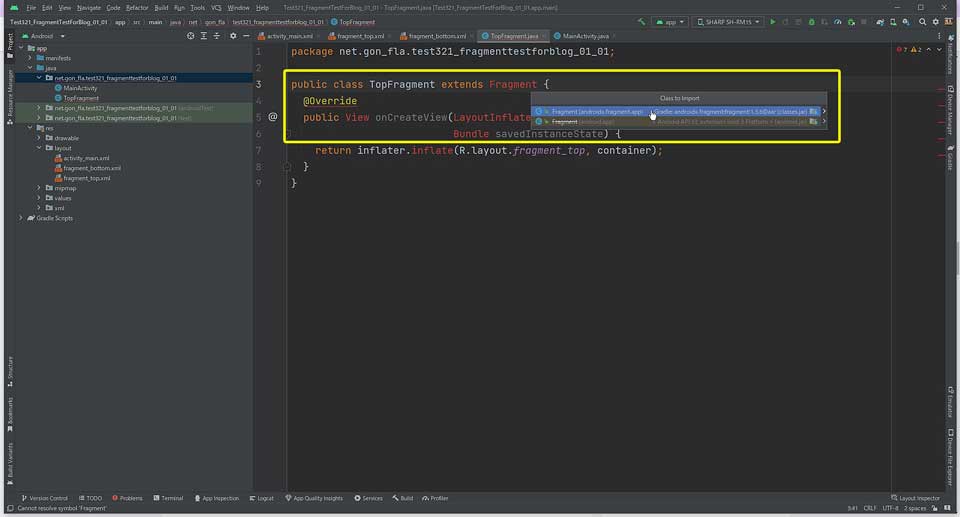
「Alt」+「Enter」でFragmentクラスを追加します。
Viewなど、他のクラスも同様です。
上記の操作でクラスをインポートできます。
レイアウトファイルでも同様です。
一つ一つ対処していきましょう。
BottomFragment.javaの作成・編集
続いて、BottomFragmentファイルです。
*BottomFragment.java
public class BottomFragment extends Fragment {

    @Override
    public View onCreateView(LayoutInflater inflater, ViewGroup container,
                             Bundle savedInstanceState) {
        return inflater.inflate(R.layout.fragment_bottom, container);
    }

}
基本形はTopFragment.java と変わりません。
ここまで記述できたら動作確認をしてみましょう。
Bottomのボタンはリスナーを作成していないので反応しませんが、
正常にFragmentを作成出来ていると思います。
BottomFragment.javaにコールバックを追加する
では、BottomFragment.javaにコールバックを追加していきましょう。
public class BottomFragment extends Fragment {

    private interfaceBF ma_listener;

    public interface interfaceBF{
        void myCallBackFromFragment();
        void myCallBackFromFragment2(String a);
    }

    @Override
    public void onAttach(@NonNull Context context) {
        super.onAttach(context);
        try {
            if (context instanceof interfaceBF) {
                ma_listener = (interfaceBF) context;
            }
        } catch (ClassCastException e) {
            throw new ClassCastException(context.toString() + "");
        }
    }

    @Override
    public View onCreateView(LayoutInflater inflater, ViewGroup container,
                             Bundle savedInstanceState) {
        return inflater.inflate(R.layout.fragment_bottom, container);
    }

    @Override
    public void onViewCreated(View view, Bundle savedInstanceState) {
        super.onViewCreated(view, savedInstanceState);

        ma_listener.myCallBackFromFragment();

        Button btn;
        btn=view.findViewById(R.id.bottom_btn);
        btn.setOnClickListener(new View.OnClickListener() {
            @Override
            public void onClick(View v) {
                ma_listener.myCallBackFromFragment2("btn click");
            }
        });

    }
}
onCreateView はそのままでそれ以外を追記しています。
MainActivity.javaにコールバック関数を追加する
次に、MainActivity.javaを追記していきます。
public class MainActivity extends AppCompatActivity implements BottomFragment.interfaceBF{

  @Override
  protected void onCreate(Bundle savedInstanceState) {
    super.onCreate(savedInstanceState);
    setContentView(R.layout.activity_main);

    TextView tv;
    tv=findViewById(R.id.tv);
    String str="Fragment Test";
    tv.setText(str);

  }

  @Override
  public void myCallBackFromFragment() {
    Log.d("debugs","myCallBackFromFragment-logs:");
  }
  @Override
  public void myCallBackFromFragment2(String msg) {
    Log.d("debugs","myCallBackFromFragment2-logs:"+msg);

  }
}
onCreate内にTextView~の記述を追加していますが、
特になくてもかまいません。
またTextView tvの「TextView」が赤字になっている場合は
「Alt」+「Enter」から【import class】でTextViewkurasuをimportします。
加えて「Log.d」部分の「Log」も赤字になっている場合は
TextViewと同様に対応すると解決できます。
Unknown fragmentsエラーの対処
それではUnknown fragmentsのエラーを解決しましょう。
後で追加すると書いたdammy_fragment_layout.xmlファイルの内容ですが
特に指定はありませんが例を載せておきます。
dammy_fragment_layout.xmlを作成・編集する
*dammy_fragment_layout.xml
<?xml version="1.0" encoding="utf-8"?>
<androidx.constraintlayout.widget.ConstraintLayout xmlns:android="http://schemas.android.com/apk/res/android"
    xmlns:app="http://schemas.android.com/apk/res-auto"
    xmlns:tools="http://schemas.android.com/tools"
    android:layout_width="match_parent"
    android:layout_height="match_parent">

    <TextView
        android:id="@+id/textView2"
        android:layout_width="wrap_content"
        android:layout_height="wrap_content"
        android:text="DammyFragmentLayout"
        android:textSize="36dp"
        android:textColor="#FF000000"
        app:layout_constraintBottom_toBottomOf="parent"
        app:layout_constraintEnd_toEndOf="parent"
        app:layout_constraintStart_toStartOf="parent"
        app:layout_constraintTop_toTopOf="parent" />
</androidx.constraintlayout.widget.ConstraintLayout>
dammy_fragment_layout.xmlの追加、編集が出来たら、
activity_main.xmlを編集します。
    <fragment
        android:id="@+id/fragment_top"
        android:name="net.gon_fla.test321_fragmenttestforblog_01_01.TopFragment"
        android:layout_width="match_parent"
        android:layout_height="wrap_content"
        android:layout_weight="0.5"
        app:layout_constraintEnd_toEndOf="parent"
        app:layout_constraintStart_toStartOf="parent"
        app:layout_constraintTop_toBottomOf="@+id/tv"
        tools:layout="@layout/dammy_fragment_layout" />

    <fragment
        android:id="@+id/fragment_bottom"
        android:name="net.gon_fla.test321_fragmenttestforblog_01_01.BottomFragment"
        android:layout_width="match_parent"
        android:layout_height="wrap_content"
        android:layout_weight="0.5"
        app:layout_constraintEnd_toEndOf="parent"
        app:layout_constraintStart_toStartOf="parent"
        app:layout_constraintTop_toBottomOf="@+id/fragment_top"
        tools:layout="@layout/dammy_fragment_layout" />
赤字部分のtools~の行を追加します。
またtoolsが赤字で表示された場合は「ALT」+「Enter」で
toolsを追加できます。
追加すると親タグ(ConstraintLayout)に
xmlns:tools="http://schemas.android.com/tools"
が追加されます。
以上、静的フラグメントの実装でした。


コメント